 |
SOP
#03 - Installation of RP5 using F4Patch 4.1 (rev 002)
Written
by
John "Triton" Waller, Kurt "Froglips"
Giesselman and Nils "Wolverine" Holmgren
Revised
by
Nils "Wolverine" Holmgren
[
Download
a pdf-version of this document ] |
This
document provides step-by-step instructions in how to install
RP5 using
F4Patch Standard 41RP5a.
You
must download or have on your hard drive the following required
software:
Falcon
4 1.08US Patch: Link
to download (17.1MB)
Falcon
4 1.08i2 executable: Link
to download (1.7MB)
F4Patch
Standard 41RP5a: Link
to download (7.9MB)
185th
filter for RP5: Link
to download (3.6kB)
If
you desire (not required) you can also download these addons:
F4Patch
Cockpit 4.0: Link
to download (40.4MB)
F4Patch
Sound 4.0: Link
to download (4.9MB)
F4Patch
Skin 3.2: Link
to download (7.1MB)
To install, follow these instructions:
- Backup
the config folder, campaign\save folder and phonebk.dat
file in the Falcon4 folder (Default path is C:\Microprose\Falcon4,
but you may have stated otherwise when you installed Falcon
4).
- Uninstall
Falcon 4.
- Manually
delete the Falcon4 folder.
- Reboot
your PC.
- Install
Falcon 4 from retail CD-ROM.
- Install
the Microprose 1.08US patch.
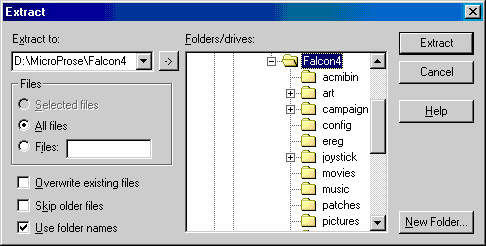
- Unzip
the content of Falcon4_108i2.zip to your Falcon4 folder.
- Unzip
the content of F4Patch_Standard_41RP5.zip to your Falcon4
folder.
|
 |
- You
should now have the following files in your Falcon4 folder:
|
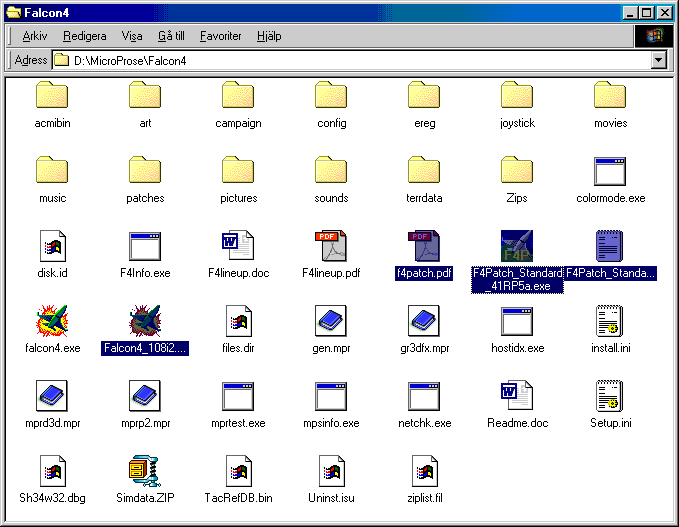 |
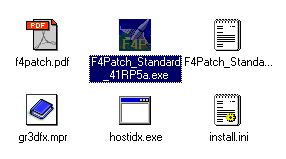
- From
your Falcon4 folder, double click on the F4Patch_Standard_41RP5a.exe
file.
|
 |
- Click
Cancel at the welcome screen.
- Note:
On the title list of the dialog you should see the name
F4Patch - Standard Package v4.1 RP5a. If not, you don't
have the correct F4Patch package. Chose File, then exit
from the menu and download the correct file from above.
|
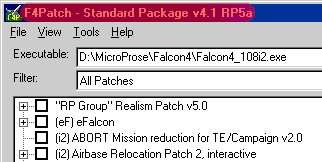 |
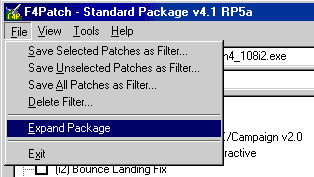
- Select
"File" and then from the drop down menu "Expand Package".
|
 |
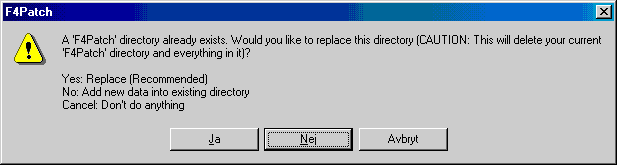
- The
following dialog is shown (The button text is in Swedish:
Ja = Yes, Nej = No).
|
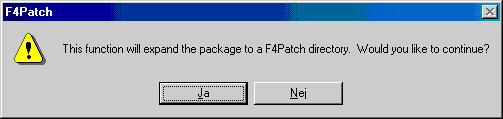 |
- Click
"Yes" and "No" to the two following
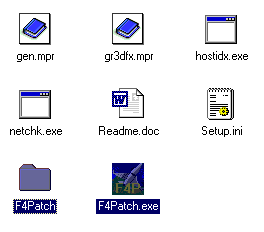
question. This will create a F4Patch.exe and a F4Patch folder
in your Falcon4 folder as seen below. After that a dialog
appears. Note the text that states: the new F4Patch.exe
is to be used to apply patches in the F4Patch folder (directory).
This means you should use the newly created F4Patch.exe
rather then the F4Patch_Standard_41RP5a.exe you are using
at the moment. You also have an option to let the program
create a shortcut for F4Patch on your desktop or you can
create one manually afterwards.
|
 |
- Click
"Yes" or "No" depending on if you like
to have the F4Patch shortcut added to desktop or not, then
choose "File" and "Exit".
- Delete
the F4Patch_Standard_41RP5a.exe from your Falcon4 folder.
- Unzip
the 185th
RP5 filter to your new Falcon4\F4Patch folder.
- Start
F4Patch 4.1 by double clicking F4Patch.exe. Click Cancel
at the welcome screen. Note: Make sure that F4Patch
points to the Falcon4_108i2.exe before applying anything!
Click the "Filter" drop down and choose the 185th
RP5 filter (Note: the filter version will now say 185RP5ver4
as opposed to what's shown below).
|
 |
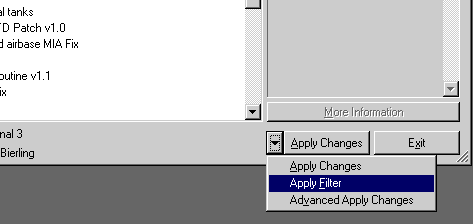
- To
apply the filter click on the dropdown menu to the left
of the "Apply Changes" button, see below.
|
 |
- Click
"Apply Filter". This will apply all patches in
the filter. Click OK to close the dialog that appears.
All
the 185th's required patches are now applied. Change
the filter back to "All Patches" and select any
of the following options:
- Skyfixes.
- Missile
trails.
- DirectX
proxies. Note: Glide-based cards (3Dfx) should use
F4DX, Direct3D based cards (GeForce, TNT, etc) should use
F4Turbo and apply the devCreateSurface/CTD fix. If you use
Win 2k you should only
use F4 DX.
- Sounds.
For online play please only use the sounds included in the
F4Patch sounds package.Other 3rd party sounds such as Greyhawk's
may cause problems for online flights (unfortunate, as these
are
great sounds!)
- Cockpit
Kneemap Korea.
When
you have finished click "Apply Changes", then choose
"File" and "Exit" to close F4Patch.
Installation
of cockpits (Note: The procedure described is exactly the
same for applying any other F4Patch package, i.e. for the
Sound- and Skin packages): Note: This installation
is very similar to that described above. However, do note
that there are one crucial step that is different and
it is imperative that this is done as outlined below or you
will end up with a corrupt installation.
- Download
the F4Patch_Cockpit_40.zip file.
- Unzip
F4Patch_Cockpit_40.exe into your Falcon4 directory.
- Run
the F4Patch_Cockpit_40.exe.
- Click
"File" and then "Expand Package".
- Answer
"Yes" to the first prompt to proceed. The following
dialog will then appear.
|
 |
- Crucial:
Click "No" on this dialog!
- Choose
"File" then "Exit". Remove the F4Patch_Cockpit_40.exe
from the Falcon4 folder.
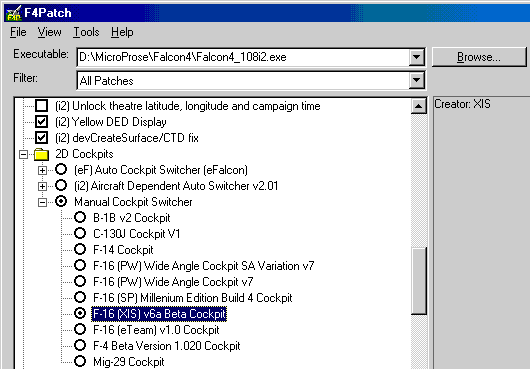
- Start
F4Patch.exe and select a cockpit, see picture below for
an example. Note: We recommend that you use the manual switch
option.
- Click
"Apply Changes" to install the cockpit.
|
 |
| Installing
a cockpit manually:
If
you wish not to use the F4Patch cockpits package you can install
a cockpit manually:
- Download
the cockpit you wish to use.
- Unzip
it to the Falcon4\art\ckptart folder.
IMPORTANT!
Do not overwrite or replace the menu.dat file!
This
will mess up RP5. If you accidentally overwrite the menu.dat
file then RP5 will be grayed out. This will require you to
replace the file with one from an RP5 installation or a manual
copying of the file from the F4Patch orig subdirectory. So,
no big thing, but this can be avoided if you remember not
to overwrite the menu.dat file.
Installation
of sounds and skins:
The
installation process for the sounds and skins additions to
F4Patch is identical to the cockpit installation. Please follow
the cockpit installation but substitute the F4Patch_Sound_40.exe
or the F4Patch_Skin_32.exe where appropriate. If you have
any problems don't hesitate to ask any of the other 185th
members for help.
Game settings:
To
preserve RP5:s full functionality there are 2 required graphics
settings:
- Object
Density must be set to 6.
- Player
bubble must be set to 3.
These
settings place higher demands on CPU, GPU, i.e. higher demands
on your PC, so if you find that the FPS has dropped below
10-15 FPS, adjust the following settings:
- Terrain
Texture and Terrain Detail.
- Object
Detail.
- Canopy
cues (Reflections gives a very large FPS hit!)
Enjoy
the realism of RP5 and flying with the 185th!
|
|
[
Download
a pdf-version of this document ]
|
| 185th
Reservoir Dogs SOP #03 - Installing RP5 using F4Patch
4.1 |
This
document is subject to changes |
|